Two OCTA-CAPTURE units can be connected to a computer to use them as a 24-in/20-out audio interface. The following procedure will guide through setting up two OCTA-CAPTUREs to be used simultaneously with Windows.
NOTE:
- The OCTA-CAPTURE driver must be installed prior to following the setup below. You may download the driver by clicking here.
- A maximum of two OCTA-CAPTURE units can be synchronized.
- When using two units, they cannot be used with the 192 kHz setting.
Before you start making settings, disconnect both OCTA-CAPTURE units from the computer and turn off their power.
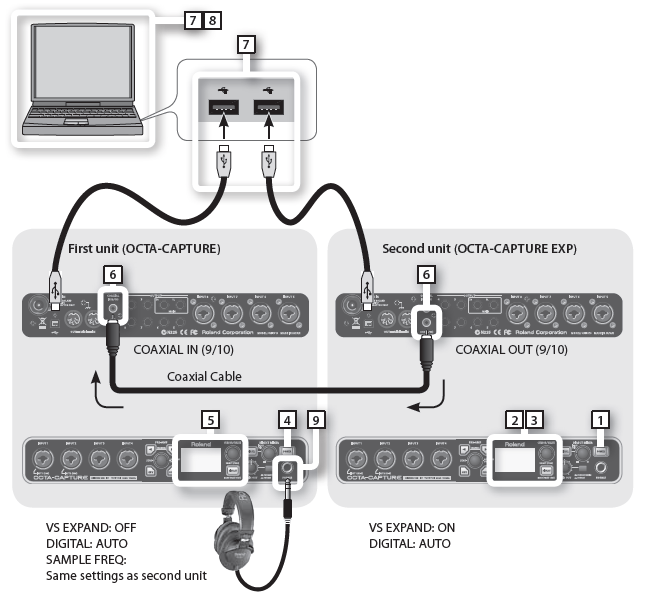
Second Unit (EXP OCTA-CAPTURE) Settings
- Switch on the power to the second OCTA-CAPTURE unit. The second OCTA-CAPTURE unit will be the timing master.
- Sample Rate and VS Expand Settings
-
- Press and hold the [DISPLAY] button for one second to access the system setting (UTILITY) screen.
- Turn the [CURSOR/VALUE] knob to move the cursor to “SAMPLE FREQ” and then press the knob inward to select it.
* When using two units, they cannot be used with the 192 kHz setting. - Turn the [CURSOR/VALUE] knob to change the setting to a desired sample rate and then press the knob inward to confirm the setting.
* The two OCTA-CAPTUREs sample rates need to match. - Turn the [CURSOR/VALUE] knob to move the cursor to “VS EXPAND” and then press the knob inward to select it.
- Turn the [CURSOR/VALUE] knob to change the setting to "ON" and then press the knob inward to confirm the setting.
* Be sure that "DIGITAL" beneath it is set to "AUTO."
-
First Unit (OCTA-CAPTURE) Settings
- Switch on the power to the first OCTA-CAPTURE unit.
- Sample Rate and VS Expand Settings
-
- Press and hold the [DISPLAY] button for one second to access the system setting (UTILITY) screen.
- Turn the [CURSOR/VALUE] knob to move the cursor to “SAMPLE FREQ” and then press the knob inward to select it.
- Turn the [CURSOR/VALUE] knob to change the setting to match the second OCTA-CAPTURE unit.
* The two OCTA-CAPTUREs sample rates need to match. - Turn the [CURSOR/VALUE] knob to move the cursor to “VS EXPAND” and then press the knob inward to select it.
- Turn the [CURSOR/VALUE] knob to change the setting to "OFF" and then press the knob inward to confirm the setting.
* Be sure that "DIGITAL" beneath it is set to "AUTO."
-
Connections
- In order to digitally synchronize the two units, use a digital coaxial cable to connect the second unit’s COAXIAL OUT (9/10) to the first unit’s COAXIAL IN (9/10).
* Do not use an RCA or analog cable. Use only a digital coaxial cable designed specifically for digital audio. - Connect the both OCTA-CAPTURE units to the computer via USB to USB ports that are near each other.
Computer Configuration
Second Unit (EXP OCTA-CAPTURE) Only
-
-
- In the Mac OS Finder, open the [Applications] folder, then the [Utilities] folder and then double-click [Audio MIDI Setup].
- Click [Show MIDI Window] in the [Window] menu to display the “MIDI Studio” window.
- Confirm that [OCTA-CAPTURE EXP] appears in the “MIDI Studio” window.
Note: If [OCTA-CAPTURE EXP] does not appear or if it is grayed out, click the [Rescan MIDI] icon. You may also try turning the OCTA-CAPTURE off and then on again. - In the Audio MIDI Setup window, click the [Add Device] icon twic. Two [new external device] icons will appear.
- Double-click on each added [new external device] icon and then enter the name in the [Device Name] field. For each [new external device], enter the following
names: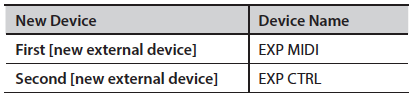
- Using your mouse, drag and connect the
 buttons of the existing [EXP OCTA-CAPTURE] and the newly added devices.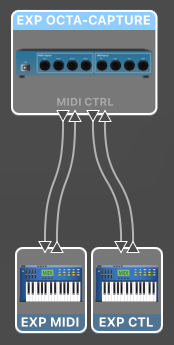
-
Creating an Aggregate Device
-
- In the Mac OS Finder, open the [Applications] folder, then the [Utilities] folder, and then double-click [Audio MIDI Setup].
- Click the [+] button and click “Create an Aggregate Device.” “Aggregate Device” will appear in the list.
- Double-click on “Aggregate Device” and then change the device set name to “OCTA-CAPTURES.”
- From the audio devices at the right, add a check mark to “Use” for “OCTA-CAPTURE” and then for “OCTA-CAPTURE EXP.”
- If there is a clock source field, choose “OCTA-CAPTURE EXP.”
- If a check mark has been placed in the Resample field or the Drift Connection field, clear the check mark.
The number of audio ports will increase, allowing you to record and play back using 24-in/20-out.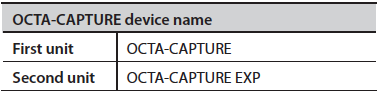
Settings for Monitoring Through Headphones
- Start up the OCTA-CAPTURE control panel.
- In the lower left of the OCTA-CAPTURE EDITOR screen, click the [OCTA-CAPTURE EXP]
button.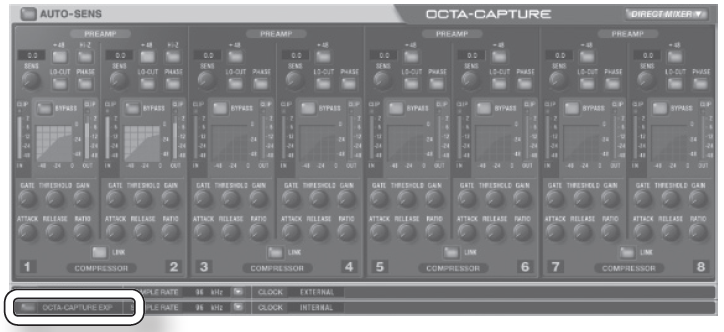
The state of the second OCTA-CAPTURE unit will be shown. - From the “Device” menu, choose [Open the Patch Bay]. The patch bay screen will appear.
- In the OUTPUT 9–10 field, choose “DIRECT MIX A.”
- Click the [Close] button to close the screen.
- In the lower left of the OCTA-CAPTURE EDITOR screen, click the [OCTA-CAPTURE]
button.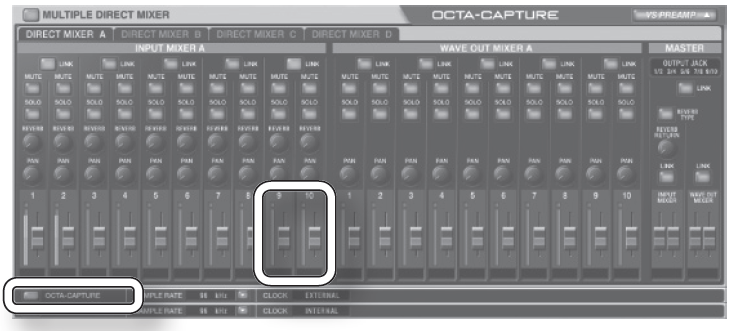
- Switch to the direct mixer control screen, and check to make sure that the sliders for channels 9-10 of INPUT MIXER A are sufficiently raised.
- In order to monitor in stereo, set the channel 9 PAN to far left (100%L) and the channel 10 PAN to far right (100%R).
- From the “Device” menu, choose [Open the Patch Bay]. The patch bay screen will appear.
- Make sure that “DIRECT MIX A” is selected in the OUTPUT 1–2 field. If something else is selected, change it to “DIRECT MIX A.”
All input signals of the second OCTA-CAPTURE unit will be output from the PHONES jack of the first unit.